The circular mirrors I want from the HORCHOW COLLECTION are $6000.00 each and weigh like 40 pounds each. Why is wall art and mirrors so heavy? And even though it's for life, there is no friggen way I would pay more then 50 bucks for any type of wall at ART any store... anywhere - EVER AGAIN! So I had to find or make something. I wanted a rough textured piece above my buffet; and I wanted it to be lightweight in-expensive, and easy to do. PLUS why the frigg is everything sooooooo heavy?
So here is my fun in-expensive, lightweight ( but took a long time to make ) solution.
{=Please keep this in mind as U read.... I work messy and I give horrid descriptions. =}
Yep, those are chopsticks surrounding those $2.00 Dollarrama mirrors.... Everything for this project came from the dollar store.
CHOPSTICKS - Loony Twoons Dollar Store = $1.29 for a package of 50 = ( I bought 10 packs )
MIRRORS - Dollar Rama = 2 @ $2.00
WHITE FOAM BOARD - Dollar Rama - 4 @ $1.25
BLACK PAINT - on hand but usually 10 bucks for a quart at home depot
I had a lot of those small bottles of Craft paint that can be found at the Dollar Rama here in Canada, but I deccided on the Black interior paint form the hardware store becuase I ahd alot left over from a few other projects I have recently completed. I wish that I used a FLAT latex paint instead of this shiny satin black paint, though.
Some other stuff I used, foam brushes ( dollarrama ), glue sticks ( A LOT!!!, probably 2 packages ) rulers etc.....
I ended up grabbing 10 packages of the chop sticks becuase I needed to be sure I had enough to complete this project in the middle of the night, when I do some crafty things = I couldnt just run over to the dollar store at 3 a.m. !
I had some left over from my other chopstick mirrors, I ended up having alot of excess chopsticks laying around but I already have crafty, crafty plans for those.
This project was alot of fun, it took a while to finish but I don't mind leaving a project for a few days and returning later to do bits and pieces here and there. I finished this just after my star burst mirror, and am just getting around to posting it now. I took alot longer than I wanted it to, but I broke it up into small increments, and just took my time. I am so fortunate I have the space to have all my crafty things laid out, and very lucky I have a lovly DH who doesnt mind having bits of wood and glitter stuck to his socks ♥♥♥
Here is a phot before painting.

So first things first. These mirrors came from the Dollar Rama, an awesome Canadian dollar store. I had considered purchasing 30 or so of these and crerating a feature wall in my living room, painting the frames black and creating a huge focal point. These are un-believable lightweight and I think would look cool in a grid of 5 by 6 mirrors.....
They could be held up by 1 tack.... 1 single tack, thats how light they are and

Here - I have removed the paper backing to unscrew the mirror. Getting GLUE GUN GLUE off of glass or mirror is very difficult. I later applied a piece of mac-tack (or shelf paper - whatever you call it) to the mirror to prevent any glue gun glue or paint from adhering....

I unscrewed the hanger thing....

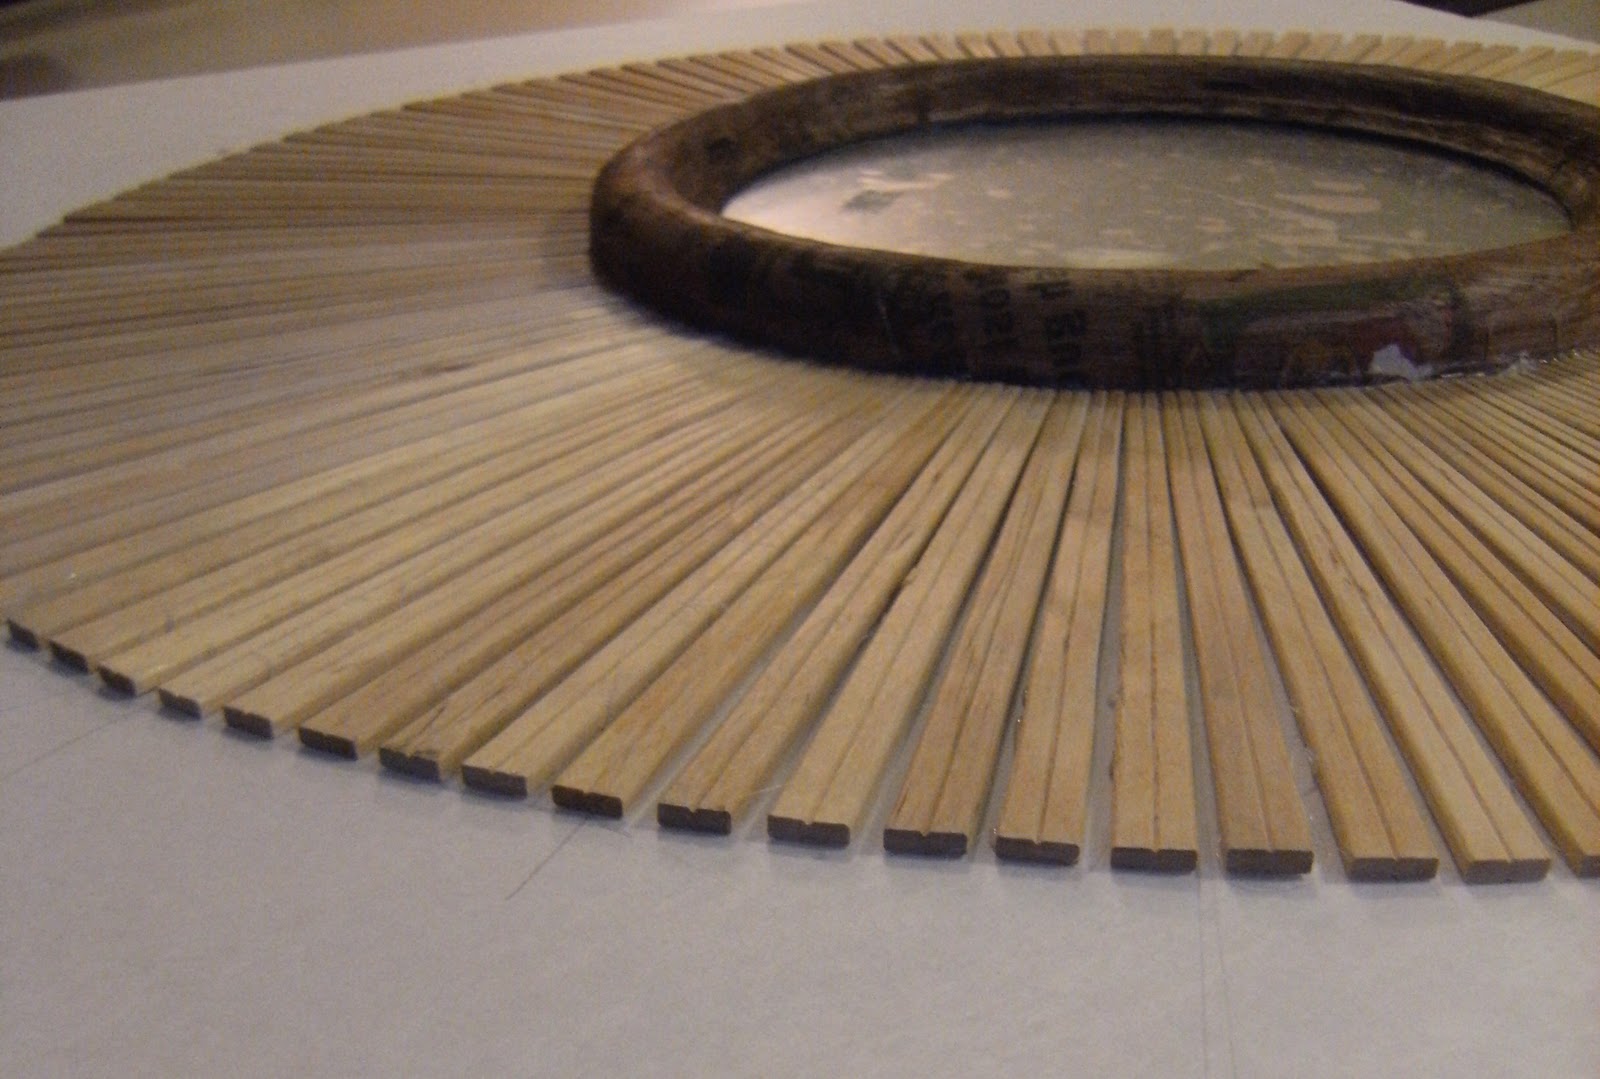
Here I have laid out the foam board that I will be gluing the chopsticks to, as well as mirror.

I glued the two pieces of foam board together but butting the edged together... and taped it down to my work surface. I drew out some guidelines, many of the chopsticks are not perfectly square, so I just needed a rough guideline for placement.

Here I used wooden skewers for the gap between my chopsticks.

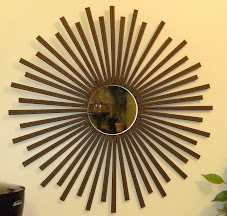
Here are my finished mirrors.

I wanted the frame of my mirrors to have a rough surface, so I used plain white glue to adhere newspaper to the frame. I then gave it a quick coat of a brown craft paint.

I hung these with wire..... Just plain garden wire. I made 4 cut-outs and looped the wire through those holes to hand these mirrors
I did this BEFORE I attached the mirror to the foam board. I cut out a circular piece of contact paper, mack tack or shelf paper, whatever you call it, and affixed it to the mirror before I reattached it to the frame. I ten attached the frame to the foam board using wire, thorough these 4 holes, and used my glue gun to further adher the frame tot he foam board ( confusing? yes I know )

Here is my mirror adhered to the foam board.
THIS IS IMPORTANT: before I began gluing down the wood chopsticks, I did a 'dry' fit first. A few of the chopsticks needed to be whittled down towards the center. It was not difficult as this is a soft wood. I used a box-cutter tot do this, then quickly sanded with this nail filing blok ( better then 95% of sanding sponges I have purchased ).

Here is 1/2 of the piece completed.

Side View

Finished product - I made those bird cages too, with more BBQ skewers & foam board!
Here is the finished piece before painting. I actually like the different shades and marbling of the wood, and wondered it i shoule stain it, instead of painting it a dark color.

Profile
Here we are outside after painting. I had cut around the piece, and added a few layered of foam board to bulk it up. I wish that I had used BLACK foam board because you can see some of the white foam board peeking out underneath the chopsticks..... I think spray paint would be a better alternative to brush-on paint?

Here is a profile view of the sides of the piece, I used my leftover foam board to bulk up the frame....Just by usinf scrap pieces of foam board and layered them on top of one another using the glue gun to attache them

I used crepe paper to 'wrap' the foam layers, so it looks like 1 solid piece, I still wanted the chopstick edge to be visible. I loooooove the look of this crepe paper edge. I just used white glue to attach it, then applied another coat of white glue when it was dry.

Here is an outdoor sunshine photos, to show the edge of the mirror, also - this is a good photo of the texture around the frame of the mirror that I achieved my adding the paper to texture-ize it.

Finished....

♥


.JPG)
.JPG)
.JPG)
.JPG)
.JPG)
.JPG)