
above - Chopstick sunburst mirror
I have been on the hunt for lightweight decorative wall art with no luck - and so I decided to make my own. I stopped into my local dollar stores and grabbed a few packages of chopsticks, some 5" circular mirrors. I am always stocked up on glue sticks and craft paint, which can be found at my local dollar stores.
Everything I have used for this project was bought at 'The .99 cent Store', 'Dollarrama', and 'A Buck or Two' in my town. The total cost for these 3 sunburst mirrors is approximately;
3 -packages of medium sized chopsticks ($1.29 ea x 3) = $3.87
3 -5" mirrors @ $1 each = $3.00
1 piece of felt = = $0.33
1 package of Glue Sticks = $1.00
I already had the paint, I used DecoArt 'Burnt Umber' and DecoArt 'Gold' and 'DecoArt Silver, I also had the foam brushes as well as the cardboard laying around. I wanted to use thin balsa wood circles that can be found at craft stores but I started the project later in the evening and did not want to visit the store.... So I just used cardboard that I cut into disks.
LITERALLY EVERYTHING EXCEPT THE SCRAP PIECES OF CARDBOARD CAME FROM LOCAL DOLLAR STORES IN MY TOWN! If I was to buy all supplies needed to make this project I would estimate it at $15.00 Canadian with all items available at local dollar stores in my town.
Please forgive my lack of instruction giving skills, hopefully things can be sorted out by the photos, but basically I cut out 3 small cardboard circles and 3 slightly larger circles. I used a large piece of cardboard as a template to keep this sunburst somewhat square, and to ensure that when the chopsticks were glued ontot the small circle they would remain flush and even with the mirror. In the large piece of scrap cardboard which was acting as a sorta template, I cut OUT a circle with the same dimensions as the circle I was gluing the chopsticks to, this enabled me to keep the chopsticks level. I inserted the corresponding cardboard cut out circle into that spot and affixed the smaller circle on top of that, with a screw. This worked as a guideline for where to place the glue and affix the chopstick tot the larger circle
I know I could have glued the chopsticks directly to the mirror, but I chose to do it this way for several reasons. The first is that I have never attempted a project like this and these were the last 3 mirrors of this size available from the store where I found them. They are extremely lightweight and were only $1.00 CAD. If I screwed this up, I would have to purchase $80 dollar 5" mirrors from Micheal's ( sarcastic.... ) and I really wanted to keep costs down.
I used a full bottle of Burnt Umber which is 4 oz. or 118 ml..... I poured out approximately 1/4 of it, then added gold and silver paint to get the color I used, which is a sorta dark bronze colour. These have no shine to them with the exception of the mirror, of course. I like that they are matte, and just appreciate the shape of them as well a s the line in each pair of chopsticks.
This could easily be spray painted, which would speed up the time to make these, but I chose dollar store crafts paints for environmental reasons as well as costs, plus I had no place to use spray paint at the moment as this was a late night craft.
I am extremely happy with this lightweight wall art, It took a little longer than I anticipated, but I enjoyed making these and am already working on 3 other lightweight and INEXPENSIVE pieces of wall art.
Also - keep that glue gun plugged in...... I had to add a little more glue here and there even as I was putting the final coat of paint on these♥
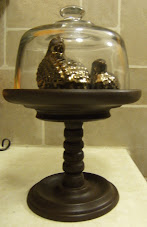
Here is the first one I finished hung in my kitchen......... Can you see my cloche that I made? I friggen love decorating blogs = thank you for all the great ideas..... Actually I cant thank you enough.

At the moment these are living on top of my enormous buffet, but they will be above my bed. This was the best lighting I had to take photos on this cloudy day~ so I hung them up here temporarily. So far they are in great shape, one even fell off the wall while I was hanging it and none of the chopsticks came loose, thank goodness!


♥
These chopsticks are stuck together at the top, I left them intact and just painted them with Deco Art craft paint that can be found at the dollar store.


The paint I used

I wanted to be sure there was no bare spots on my chopsticks, so I painted a coat on each one using a foam brush.... It did take a while but it was relaxing and meditative to do............. This photo is not the final colour, I used a small foam craft brush for this project, you could use spray paint but I love the environment and also strive to use tems that were found at the dollar store.

Here is a few designs I toyed around with before I started


I used this 'thing' to create the cardboard circles that I glued the chopsticks to...... If you can find thin balsa wood circles at Micheal's or Hobby lobby - I would go with that route before the cardboard.... when I started this project it was late in the evening and I did not feel like going out to the store.

I used this piece of cardboard as a rough template to keep things level and somewhat lined up.... I lined up 4 chopsticks to divide the sunburst into quarters, and then just eyeballed the rest. Here is the first part of the sunburst glued in place.

I will end up having to snip some of the chopsticks so they fit in between the first row of the sunburst... due to the irregular sizes of each one, as well as some of the chopsticks being glued in the wrong spot { just slightly in the wrong spot}

Here it is with the first chopsticks glued to he cardboard circle......it is flipped upside down and the chopsticks are laying flush with my work table.....

This is the back view of the sunburst, below
I used a piece of paper as a loose guideline to where the second burst of chopsticks should go while I was gluing them on ..... I did have to cut some to a point to fit within the first row of chopsticks.....
At this time I also used a thick and tough piece of wire to create a hanger for the sunburst. Next time I am using a plate hanger, as I have read this will work as well♥

Here it is with the mirror on top. This is before the final painting, and before I loaded this up with an obscene amount of glue-gun glue.

I cut out circles from black craft foam, to cover the back of the sunburst, this will protect the wall from the crude wire hanger I made, as well as offer a little more stability and hide the glue.

I used the mirror as a rough template and cut black craft foam about 1/4" larger then the actual mirror. Because there is alot of texture due to the glue 'lumps' it would have to be slightly larger to take into account the lumps of cooled glue gun glue as well as any other un-for-seen issues......

Cut out black felt circle also from the .99cent store

I used these small felt pads on a few chopsticks to ensure that the sunburst would not be flush against the wall.


.JPG)
.JPG)
.JPG)
.JPG)
.JPG)
.JPG)


4 comments:
Loved your other mirror and I adore this one! The set of 3 makes such a bold statement and they look uber cool. I am now absolutely stoked to make my own.
Super creative - great job! Thanks for the tutorial.
I just love this chopstick burst mirror. I've seen it done with skewers before, but not this way. Thanks for sharing and for the instructions.
I know this web site gives quality based content and additional material,
is there any other site which presents these data in quality?
Also visit my homepage; Carlos Network Resolution
Post a Comment